My Places
How do I create a new place?
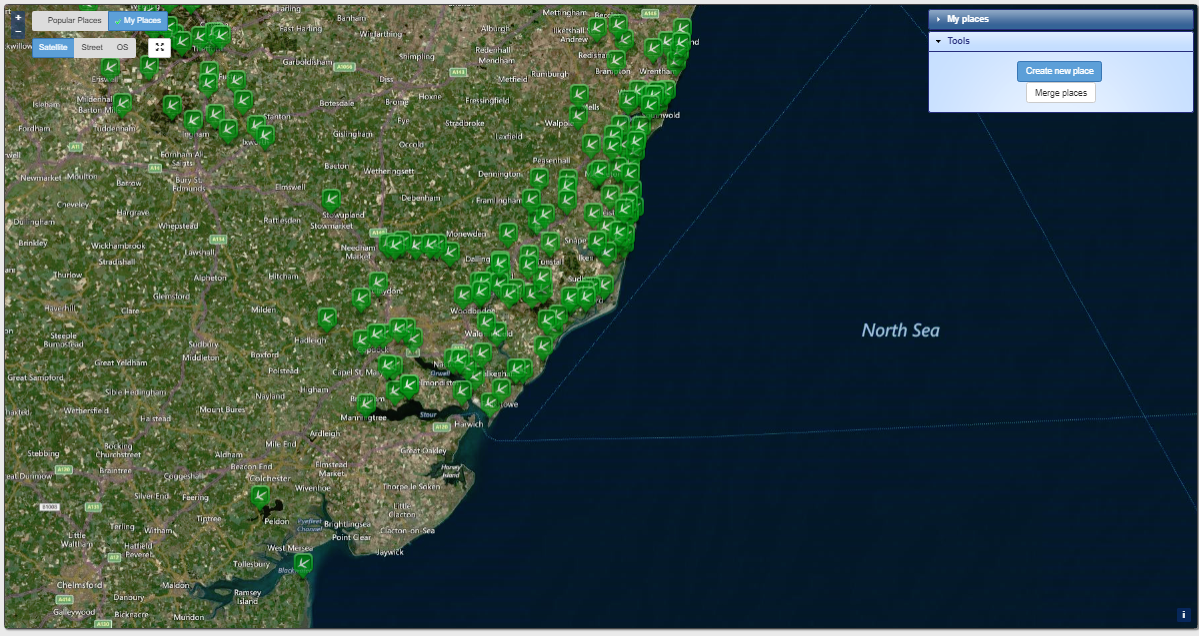
To create a new place, select ‘My Places’ in the left hand ‘Your Options’ menu. This will open a new page from where you can select ‘Create new place’ from the Tools option on the right of the map.
The easiest way to create a new place is to zoom in on the map to find the location you would like to add as one of your places, you can change the map type by selecting one of the three options available, Satellite, Street or Ordnance Survey (OS) in the top left of the map. Once you have found the location select ‘Point’ from the drawing tools menu and click on the location on the map. This will place a blue pin on the map, to move the pin just click on the map where you would like to move the pin to. Once you are happy with the pin location give the place a name (try to avoid names like ‘My Garden’ or ‘Local patch’) in the place details name box, then click save.
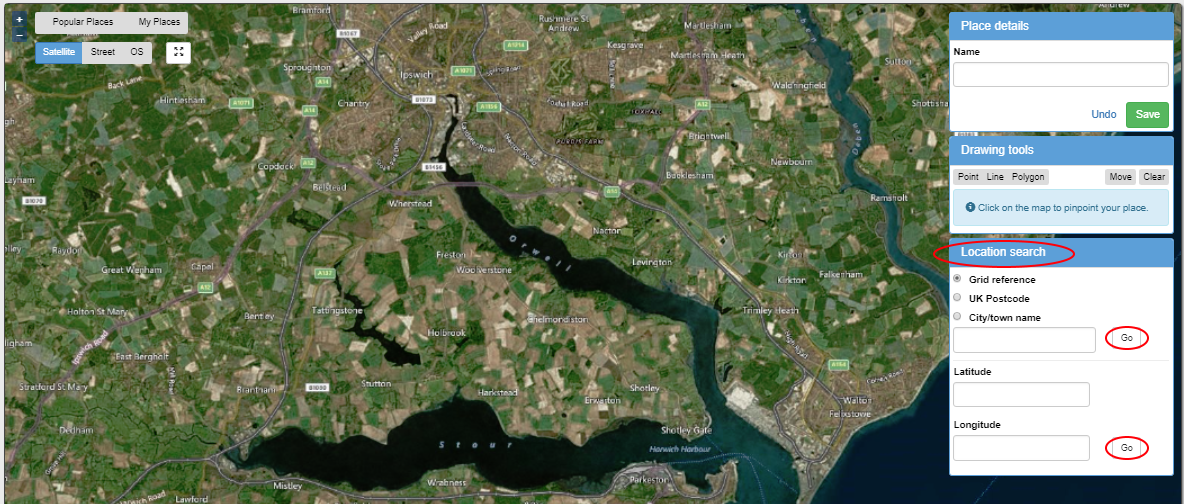
Other options to add a place include selecting a popular place from the map. You can also search using a grid reference, post code or City/town name or by entering a latitude/longitude reference. You can also define your place as a path, useful for regular walks or ferry crossings, as a polygon which is best used to mark the boundary of a place you regularly visit, or as a point to mark the location of places you may only enter occasional records against, such as birds you see from a car or train.
Option 1 – Popular birding places.
This option displays predefined areas that are reguar birdwatching places, including most RSPB reserves and National Trust properties. This option is quick and easy to use as it doesn’t require you to define the area as it has been done for you.
Popular places are shown by default but if the are not displayed select the ‘Popular places’ icon in the top left of the map page. To use a Popular place zoom in on the map to locate a place, clicking on one of the red popular places will open an information box that shows the place name and the ability to ‘Use place’. Clicking ‘Use place’ in this box will auto fill the place name. You can then click save to add the place to your list of places.
Option 2 – Location search.
This option allows you to search for a loaction using a grid reference (UK only), Post code (UK only), City/Town name or from a Latitude/longtitude reference. To search using a grid reference, post code or City/Town name select the option you wish to search by from the options in the loacations search menu on the right of the map. Next enter a 1km, 2km or 10km grid reference, UK postcode or city/town name in the top box and press go. Note – when entering a city/town name include the county/region to enable more accurate searches. The map will then centre on the location searched for. Give your place a name by filling in the name box under ‘Place details’ and click save. To search using a lat/long reference enter these in to the appropiate field in the loaction search menu and click ‘Go’. Again The map will centre on the location searched for. Give your place a name by filling in the name box under ‘Place details’ and click save.
Option 3 – Drawing tools.
This option gives you the flexibility to define a place in three ways, either as a polygon, a line or as a point. The best option to use when defining a place is explained here.
Points are designed to be used in two ways. Firstly, for one-off sightings away from birding spots, such as a raptor flying over a motorway. Secondly, for stationary birdwatching activities like sea watching, visible migration watching or vantage point surveys.
Line is great for 'A to B' routes such as a walk in the uplands or a short ferry crossing. If you are doing a transect survey of an area, you can use paths to describe the course of your transects. If you are covering long distances quickly, for example by bike or motor vehicle, it is better to use points for the various places you stopped / observed birds, rather than one very long path.
Polygons are ideal for irregularly-shaped birdwatching places such as nature reserves, water bodies and your local patch. Your polygon for each place should cover the area you usually visit / scan when you are there. For larger geographic areas like National Parks, create one or a number of smaller polygons within it that best represent the specific areas where you birded.
Guidance on polygons.
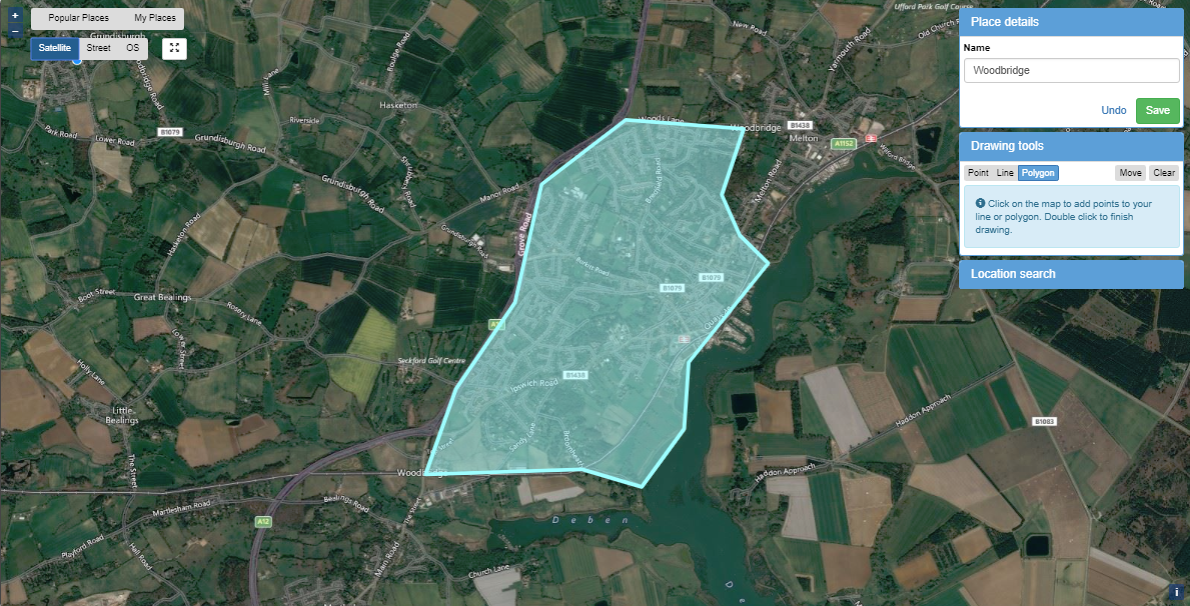
The polygon tool is a great way of drawing around the area you regularly go birdwatching, follow these instructions:
Select ‘My places’ from left of the screen. Then in the tools menu below the list of ‘My Places’ on the right of the map and select ‘Create new place’
Zoom in on the map to find the place you were birding, using the scroll wheel on your mouse or the controls on the top left of the map.
Click the 'Drawing tools' bar then select ‘Polygon’.
To begin drawing a polygon, click on the map at the point you wish to start, and then trace around the edge of the area you want to add by clicking on the map to add a point. A shaded area will show the area you are covering, to finish drawing the polygon either double click or continue until you return to the first point you added, the boundary of your polygon and the area inside it should turn pale blue. You can click clear if you wish to start again or click move to adjust the position of the completed polygon. Next enter a name (try to avoid names like ‘My Garden’ or ‘Local patch’) under ‘Place details’ and click save. Your new place will be saved in the system and will be available for you to pick from a list of your places when adding future records and also available on the app.
How do I edit one of my places?
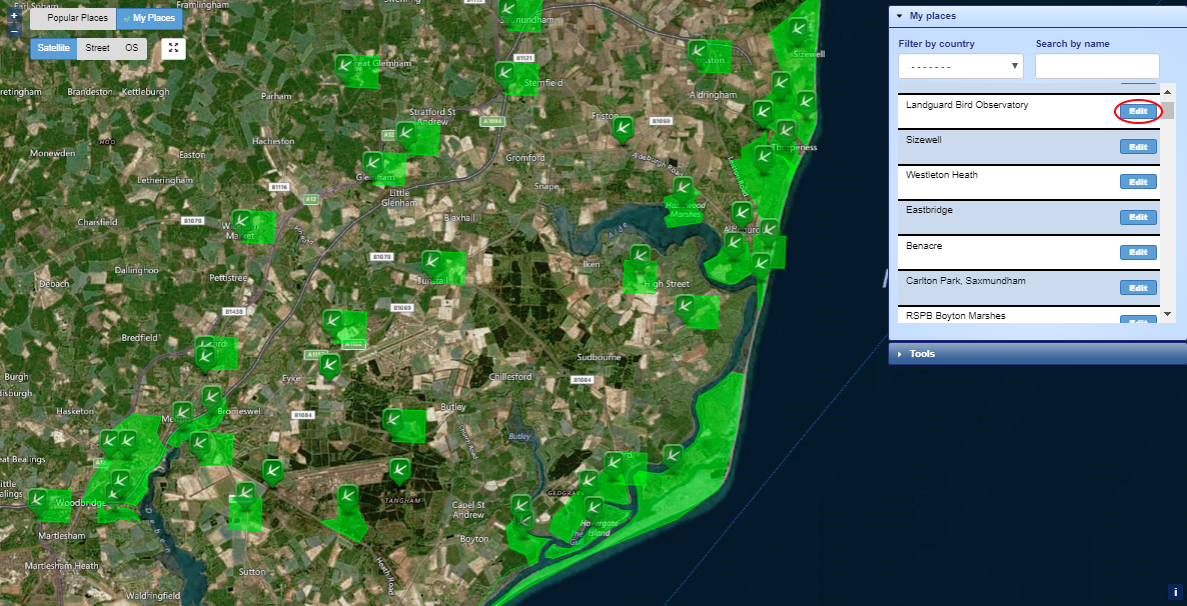
To edit a place, select ‘My places’ from the ‘Your options’ menu on the left of the screen. This will display a map of all the places you have created. The menu box on the right of the map allows you to navigate to the Place you wish to edit either by selecting the country then scrolling through the list or by typing the name of the place. Next to each place is the option to ‘Edit’ the place.
Once you have clicked ‘Edit’ a menu will open that provides the options you need to edit the place. Within the menu box the first option is to rename the place and/or add a description such as grid reference or county. It is also possible to change how you want to define the place by changing it to a polygon, path or point. For example, if you have a place set as a point but regularly visit the place and wish to define the boundary to highlight the area you bird watch in you can change it to a polygon. To do this select ‘Polygon’ in the options then ‘Drawing tools’ menu on the map, the blue pin point will disappear. Click to start drawing, and then click at another suitable point on the edge of the area you are outlining. Repeat this process until you have drawn around the whole area, the boundary of your polygon and the area inside it should turn pale blue. Click ‘Save’ to finalise the changes.
If you wish to amend the boundary of a place that is already defined as a polygon you can click edit from the drawing mode. Once you are satisfied with the edit you can click ‘Save’ to finalise the changes. This same process works for editing a path.
How do I delete one of my places?
NOTE it is only possible to delete one of your places if it has no records attached to the place.
To delete one of your places, select ‘My places’ from the ‘Your options’ menu on the left of the screen. This will display a map of all the places you have created. The menu box on the right of the map allows you to navigate to the place you wish to edit either by selecting the country then scrolling through the list or by typing the name of the place. Next to each place that have no records against them is the option to ‘delete’ the place, clicking this will delete the place and it will no longer be available to add sightings too.
How do I merge 2 of my places?
To merge two places, select ‘My places’ from the ‘Your options’ menu on the left of the screen. This will display a map of all the places you have created. Below the ‘My Places’ menu on the right of the map is a ‘Tools’ menu, clicking this will reveal ‘Create new place’ and ‘Merge places’, selecting merge places will direct you to a new screen where you can choose which places you wish to merge. The places in the left column are the places you wish to merge from and the list on the right is the place you wish to merge those in the left column with. e.g. if place A was in the left column and you merged it with place B in the right hand column place A would disappear and all records from place A would appear within place B. Below the places on the left is the option to change the boundary of the final place. The options available are to just keep the boundary of the target place (i.e. the place you wish to keep), keep the boundaries from the places you merge with or consolidate which merges the boundaries to form a single polygon boundary.



Share this page