Viewing your Life and Year Lists
Life list
To view your life list, log in then click ‘Explore data’ button in the 'Your options' menu on the left side of the page.
Next select Explore my records
At the top of the page are several filters which you can apply to your records.
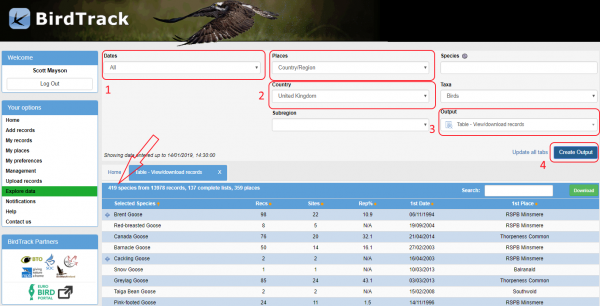
In the ‘Dates’ filter (1) select all, then in the 'Places' filter select 'Country/region', the 'Country' filter (2)then enables you to select the country you wish to view your life list from. Once you have selected the appropriate country select 'Table-View/download records' from the 'Output' filed (3) and click 'Create Output' (4)to display your life list in the table.
The number of species recorded is shown at the top left of the table (red arrow).
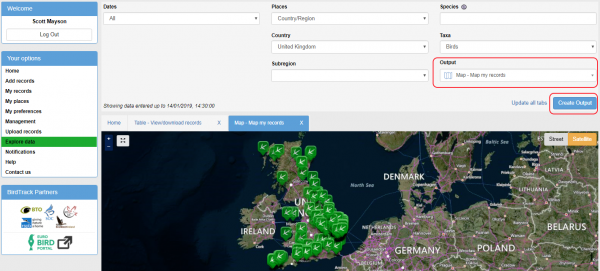
Choosing 'Map-Map my records' from the 'Output' filter and click 'Create output' to show an interactive map of your records on your life list
Year list
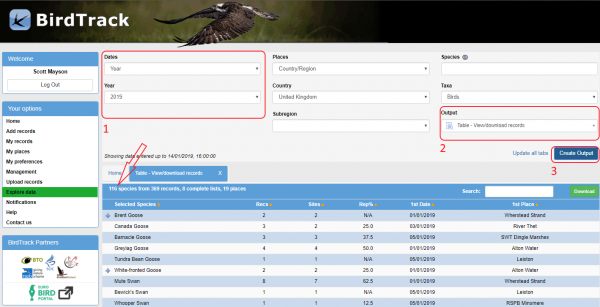
To view your year lists, select 'Year' from the ‘Dates’ filter (1). Next, use the dropdown menu from 'Years' to select the year – the current year is the default setting. Once you have selected the appropriate year select 'Table-View/download records' from the 'Output' field (2) and click 'Create Output' (3) to display your life list in the table. The number of species recorded is shown at the top left of the table (red arrow).
How can I see the records I have recently added?
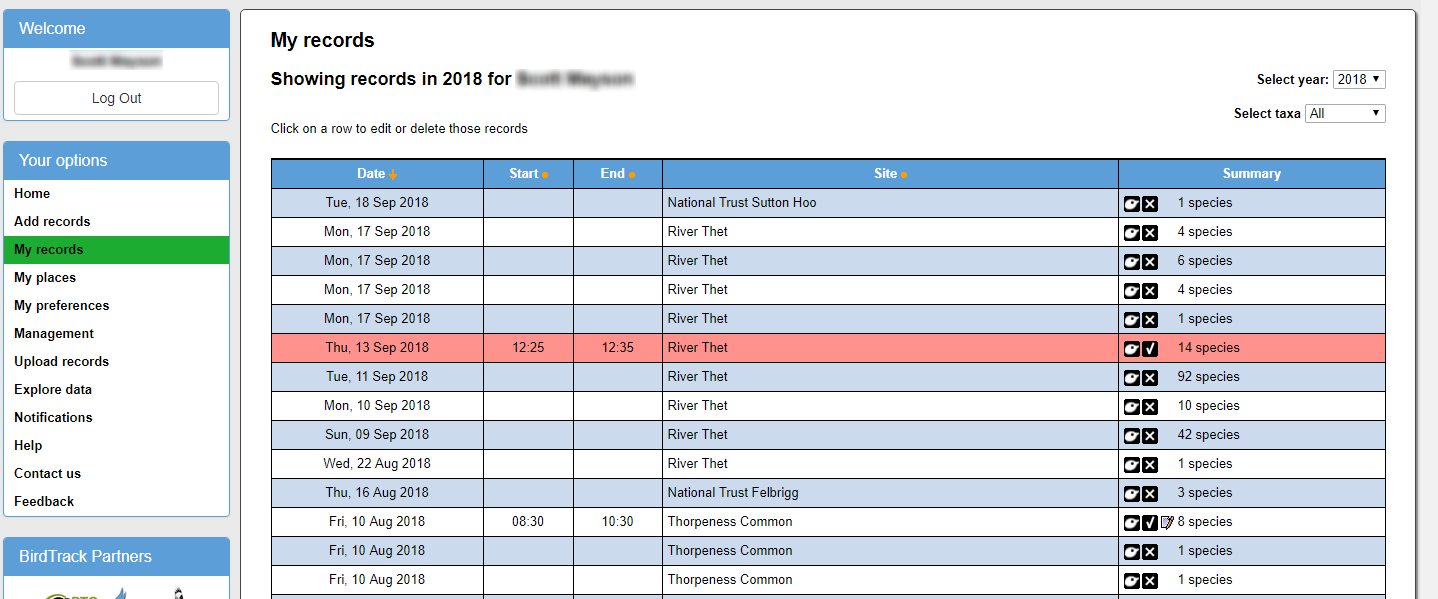
To view a record that you have entered, select ‘My records’ in the ‘Your Options’ menu on the left of the screen. This will open a new page where you can select the year for the record you wish to view using the drop down box next to ‘Select year’ at the top right of the screen. This will display a table for all the records submitted for that year in chronological order and show the date, start and end times of the visit if recorded, place name and a summary of the number of species seen. The icon showing a birds head, dragonfly or rabbit denotes the taxa recorded i.e. birds, odonata or mammals whilst the tick or cross symbol indicates if a complete list was made for that visit. The date order can be sorted from oldest to newest or from newest to oldest by clicking on the ‘Date’ header in the table.
How can I edit a record?
To edit a record select ‘My records’ in the ‘Your Options’ menu on the left of the screen. This will open a new page where you can select the year for the record you wish to edit. The date order can be sorted from oldest to newest or from newest to oldest by clicking on the ‘Date’ header in the table. Find the record you wish to edit, here you have 2 options to edit the record. Clicking on the place name for that entry will take you to the place entry details page that allow the visit details to be edited, whilst clicking on the species total under summary will enable you to edit the species information, such as counts and species recorded, for that visit.
The editing of the place and/or species details is completed in the same way as adding a record. Any changes that are made will need to be confirmed by clicking the ‘Submit’ button.
How can I download my records?
To download records from BirdTrack you will first need to select the time period and area you wish to download records for. The first step is to select ‘Explore my records’ function within ‘Explore data’ which is in the left hand ‘Your options’ menu.
From here use the ‘Dates’ and ‘Year’ filter to select the year you wish to view. Use the ‘Places’ filter to display the records either globally, by country or sub region, or for one of your places.
In the ‘Output’ field select ‘Table – View/download records’ and click the ‘create output’ button. This will display a table listing all the species you have seen in a particular year. You can also use the search field to look for a particular species. You can download this list as an Excel sheet by clicking the green ‘Download’ button at the top right of the list. A pop up is shown which displays all the selectable fields that can be included or excluded from the download, selecting ‘yes’ will include them in the final download whilst selecting ‘no’ will exclude them. Once you have made your selection of fields you wish to include click the download button at the bottom right of the pop up. Your download file will then be prepared (shown by an orange spinning circle in the bottom right of the page) and downloaded. For large amounts of data this can take several seconds.
Note you can change any of the filters to alter the records displayed in the table, once you have changed a filter click ‘Update’ to refresh the table.





Share this page